This is a post-mortem of my JS1K entry for 2019, Flux. A 1024 byte JavaScript demo with seven different scenes and a bytebeat soundtrack.
Note: This version uses a custom shim to create a full viewport canvas and plays nicely with audio autoplay. The JavaScript is identical to that used in the official JS1K entry. To play the entry in the official shim, please head over to the JS1K website.
My previous two JS1K entries, Thrust and the 2015 winner, Defender were both retro game remakes. For the final ever JS1K competition I wanted to produce something closer to a demo scene production and, for nostalgic reasons, try to reproduce some of the effects I created years ago on my Atari ST.
The content for Flux is heavily influenced by the retro demo effects I’ve created over on Dwitter. Dwitter is a place to create, share and remix 140 character JavaScript demos (called “dweets”) using a few helpers and a canvas. If you’ve not come across Dwitter before, I recommend having a look around – it’s amazing to see what can be achieved with so little.
My plan was to try and squeeze as many of my 140 byte mini-demos as possible into 1K. Although seven dweets could fit into the space, I would need extra bytes for a player to sequence and render each scene and I wanted music that I could sync the scene changes with. I settled on a conservative target of five scenes.
I already had a handful of scenes to pick from, so the first job was to generate some audio and write a demo player. From there I could determine how many bytes I would have left over for creating scenes.
Creating music
The “music” (I use that term loosely) for Flux is an 8-bit, 8kHz, mono WAV sample. The audio is a procedurally generated bytebeat, which is created at startup and played using the HTMLAudioElement interface. The sample data is created using the following function, which is called 8000 times for each second of audio:
t => (t>>5|t>>6|t) + (t*22|t>>4|t<<2) + (t>7e4&&(t%128|31));
//   ┖─────┬─────┚   ┖───────┬──────┚   ┖─────────┬───────┚
//         │                 │                    │
//         │                 │                    └──  Vary the melody for the 2nd half
//         │                 └───────────────────────  Siren effect
//         └─────────────────────────────────────────  Bass line and melody
Each generated byte is converted to a character and appended to a string.
let wavData = '';

// Our generator function (`& 255` ensures we stay between 0 and 255)
let generator = t => (t>>5|t>>6|t) + (t*22|t>>4|t<<2) + (t>70000&&(t%128|31)) & 255;

// Create the audio sample data
for (let t = 0; t < 131200; t++) {
  wavData += String.fromCharCode(generator(t));
}
Finally, the sample data is base64 encoded and combined with a WAV header. An Audio instance is created using the encoded data and its play() method is called:
// 8-bit, 8kHz, Mono WAV file header
let wavHdr = 'data:audio/wav;base64,UklGRqSIFQBXQVZFZm10IBAAAAABAAEAQB8AAESsAAABAAgAZGF0YYCI';
let wavData = '';

// Our generator function
let generator = t => (t>>5|t>>6|t) + (t*22|t>>4|t<<2) + (t>70000&&(t%128|31)) & 255;

// Create the audio sample data
for (let t = 0; t < 131200; t++) {
  wavData += String.fromCharCode(generator(t));
}

// Create the Audio element and play the tune
let music = new Audio(wavHdr + btoa(wavData));
music.loop = true;
music.play();
Here’s the generated sample output, in MP3 format:
Creating the final audio generation function was very much trial and error. My early efforts produced some truly horrible noises. Thankfully, there are some bytebeat tools available online which allowed me to quickly try out ideas. I used this one by Darius Bacon.
Demo player
The demo player is responsible for preparing the canvas, sequencing the scenes and scheduling the next animation frame.
First off, the player resets the canvas and draws a black background for the current scene to paint over. It then translates the canvas coordinate space so that 0, 0 is the centre of the canvas. For Flux this is important because most effects make heavy use of Math.sin and Math.cos, which return values between -1 and 1. Having a centred coordinate space means I don’t need to add offsets to calculations to centre things.
Once the canvas is prepared, the current scene is rendered to it. Each scene is defined by a function that generates content based on the passed time value argument. Scenes are switched at half second intervals in sync with the beat of the soundtrack.
f = t => {
  c.fillRect(                     // render black background
    0,
    0,
    1e3,
    a.height |= 0,                // reset the canvas/context
    requestAnimationFrame(f)      // schedule next frame
  ),
  c.translate(320, 174),          // centre the coordinate space
  [
    t => { },                     // scene 1
    t => { },                     // scene 2
    t => { },                     // scene 3
                                  // ...
    t => { }                      // scene 7
  ][t / 500 % 7 | 0](t / 1e3)     // render a scene based on current time
}
It’s worth pointing out that, as a standalone block of code, there appear to be some obvious missed-minification opportunities here. For example, switching a.height for a.width in this instance would perform the same job and save a byte. The code here is written to get the best out of RegPack, which works on pattern repetition across the entire source. In this case, swapping height for the shorter width actually increases the output size by a byte. Try to keep this in mind when looking over the code snippets.
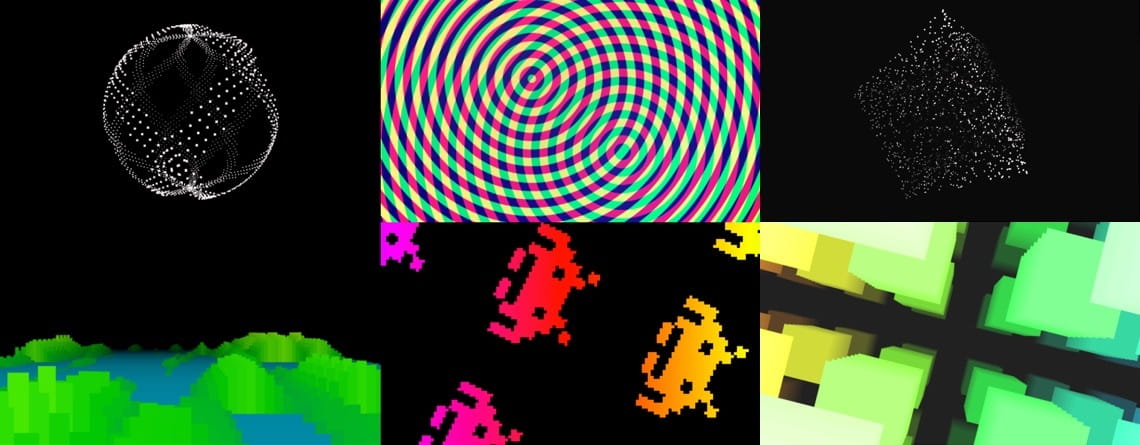
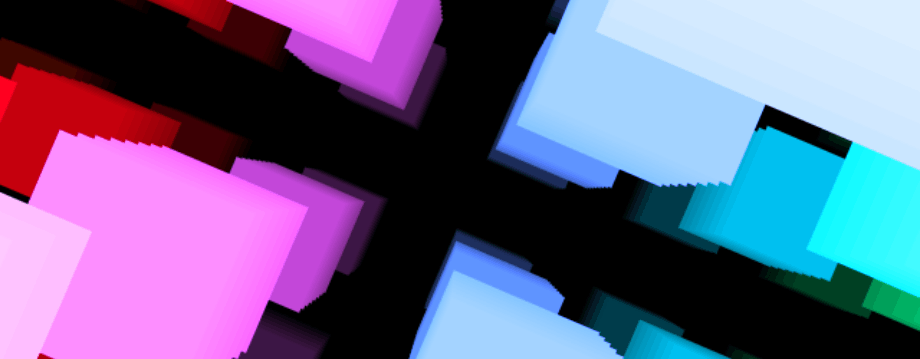
Scene 1 — Interference Circles
An effect that wouldn’t look out of place in an 80’s trance video, interference circles are two or more independently moving layers of concentric circles that change colour where they overlap. This effect was often seen in Atari ST/Amiga demos, where leveraging the effect of overlapping bitplanes made it relatively cheap (in terms of CPU cycles) to achieve.
The Flux version builds on a 140 byte dweet I wrote back in 2018. It uses the exclusion image compositing operation to generate the ring overlays and handle the colour change effect.
Each ring layer is created by drawing a series of solid circles on top of each other, with each having a larger radius than the previous. When used with the correct colour values, exclusion causes the current draw operation to invert the previous one, effectively causing each circle to punch a hole in the last. Once every circle has been painted, the layer will contain a series of uniformly spaced rings.
To complete the effect, the circles in each layer are painted with a different colour, allowing the exclusion operator to create the layer overlay colour effect. Finally, to disguise the simple layer movement paths, and to ensure the effect induces a full-on headache, the canvas is rotated each frame.
Here’s the source code for the effect:
t => {
  for (
    c.rotate(t),                              // rotate the canvas
    c.globalCompositeOperation = "exclusion", // set compositing op
    j = 64                                    // we're drawing 64 circles
  ;
    j--                                       // loop until done
  ;
    c.fill(                                   // paint to canvas (happens last)
      c.arc(                                  // draw a circle
        128 * Math.cos(G += t),               // animate along X axis (offset by layer no.)
        50 * Math.cos(G += t),                // animate along Y axis (offset by layer no.)
        9 * j,                                // radius increases per iteration
        0,
        7,
        c.beginPath()                         // begin the circle path (happens first)
      )
    )
  )
    H(                                        // alternate hue for each layer
      G = 128 * j & 255,                      // `G` is our layer index
      50
    )
}
Scene 2 — Point cube
This scene is a 3D cube of pseudo-random points rotating around two axis with perspective. It’s based on my 139 byte point cube dweet but has been reworked to play well with the minifier.
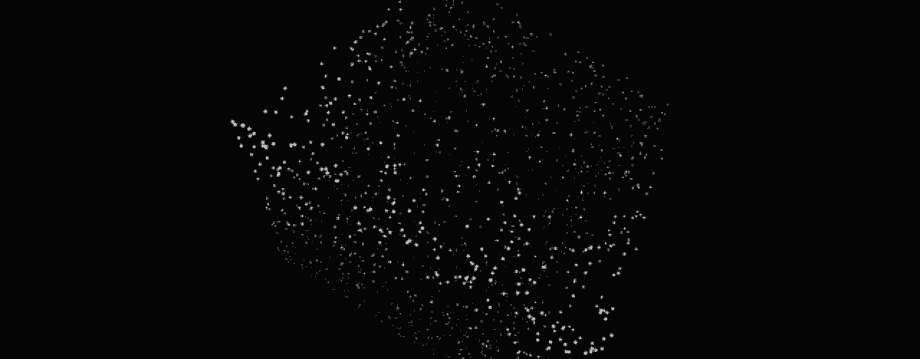
The Dwitter version uses trigonometry to calculate rotations around both the X and Y axis. To save bytes in Flux, I dropped the X rotation calculations and cheated a Z rotation by applying a transform to the canvas prior to drawing any points. If you pay attention to the scene in the demo, you’ll see the square points aren’t aligned to the viewport because of the canvas rotation.
This visual trade-off means the Z rotation comes for free because it uses exactly the same rotation code as the Interference Circles scene (c.rotate(t)) — RegPack loves this kind of repetition.
t => {
  for (
    c.rotate(t),                              // rotate the canvas (fake the z axis rotation)
    H(0, j = 2e3)                             // set colour to white and configure 2000 points
  ;
    j--                                       // loop until done
  ;
    c.fillRect(
      (                                       // rotate
        Math.cos(t) * Math.sin(j * j * j)
        -
        Math.sin(t) * Math.sin(j)
      ) * r,
      Math.cos(j * j) * r,
      r / 50 - 1,                             // use sub-pixel anti-alias to perform shading
      r / 50 - 1
    )
  )
    r = 255 / (3 - (                          // rotate
      Math.sin(t) * Math.sin(j * j * j)
      +
      Math.cos(t) * Math.sin(j)
    ))
}
Scene 3 — Cubefield
This effect was inspired by the output from my experiments with ray marching using distance estimator functions. It’s based on my 140 byte cubefield dweet but has better camera movement and colours.
The effect is created by drawing multiple layers of squares from back to front. The squares on the bottom layer are drawn at a smaller scale and with a lower lightness to give the impression of perspective and distance. The scale and lightness are slowly increased when drawing the other layers. To create the spacing along the Z axis, layers are skipped at regular intervals.
Camera movement is simulated by drawing the layers at an offset along the X axis — using a simple arc, and along the Y axis — using the current time. Z axis movement simulated by offsetting the position at which layer drawing begins. Finally, the same rotation method used in the first two scenes is applied to rotate the canvas.
Here’s the code for the cube field scene:
t => {
  for (
    c.rotate(t),                  // rotate the canvas (faking camera z spin)
    j = 4e3                          // we're going to draw 4000 rectangles
  ;
    j--                              // loop until all have been draw
  ;
    512 & j || H(                    // on every 8th layer (512)
      j % 8 * 50,                       // set hue based on horizontal position `j`
      99 - 1e4 / r,                     // set lightness based on distance `r`
      c.fillRect(                       // draw a single square
        (3 - Math.cos(t) - j % 8) * r,     // at X between -4 and 4 with cos() offset (camera X)
        (3 - (j / 8 & 7) + t % 1) * r,     // and Y between -4 and 4 with time offset (camera Y)
        r /= 2,                            // draw at half size to leave a gap
        r
      )
    )
  )
    r = 3e3 / (j / 128 + t % 1 * 8)  // compute distance (camera Z)
},
Scene 4 — Starfield
Not much to say here. This is a simple starfield that was golfed from 98 down to 89 bytes on Dwitter (at the time of writing I believe this is the smallest starfield on Dwitter). To save an extra two bytes, I switched the Z direction so it appears the viewer is looking out from the rear of a ship. As well as saving bytes, this tweak added subtle contrast to the other 3D effects in Flux, which generally travel towards the viewer.
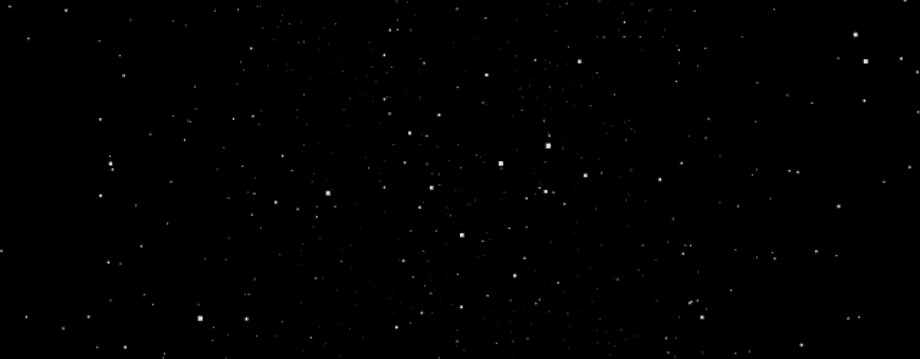
Here’s the code for the effect:
t => {
  for (
    H(0, j = 2e3)                // reset fill to white, set counter for 2000 stars
  ;
    j--                          // keep looping until all stars are drawn
  ;
    c.fillRect(                  // draw a single star
      Math.sin(j) * r,             // pseudo-random X position scaled by `r`
      Math.sin(j * j) * r,         // pseudo-random Y position scaled by `r`
      r /= 255,                    // scale `r` so sub-pixel aliasing handles greyscale
      r
    )
  )
    r = j / (++t % 8)              // calculate the stars current distance
}
Scene 5 — Terrain
This scene is a pseudo-3D terrain fly over based on one of my favourite (and most challenging to write) dweets, the 139 byte rolling terrain.
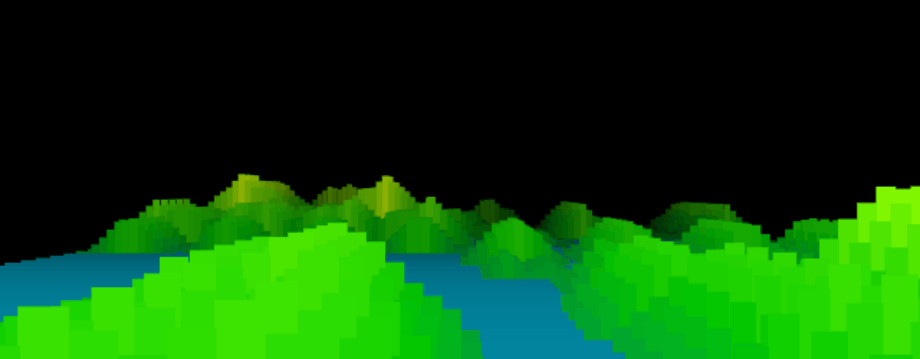
The effect works in exactly the same way as the cube field; rectangles are drawn from back to front with gradually increasing lightness and scale. Unlike the cube field, which draws multiple squares along the X, Y and Z axis, this effect only draws rectangles along the X and Z axis.
The terrain height map is computed using the same method I used to generate the infinite mountain range in Defender. Each rectangle is drawn with a height from the height map and offset from the ground, creating a slice of a hill. The height value is also used to control which colour is used; blue, for water — or a shade of green, for land.
t => {
  for (
    Z = L = 50
  ;
    G = Z-- / 9
  ;
  )
    for (
      Y = j = L
    ;
      j-- > -L
    ;
      c.fillRect(
        j / G * 19,
        U / G * 3,
        20 / G,
        255
      )
    )
    Y += 7 * Math.cos(j / 2 ^ G * 2 + t * 9),
    U = Y < L ? Y : L,
    c.fillStyle = H(
      U < Y ? 190 : U + 90,
      50 - U / 3 - G * G
    )
  }
Scene 6 — Globe
This is almost a perfect copy of my 103 byte Dwitter globe but refactored to match the footprint of the Point Cube function body in scene 2.
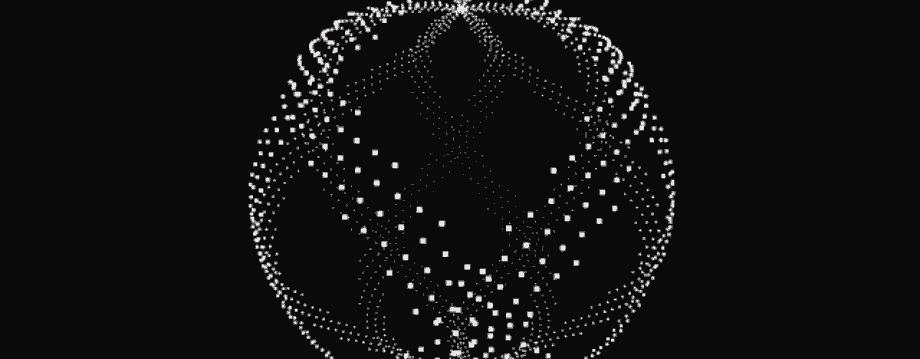
t => {
  for (
    H(0, j = 2e3)
  ;
    j--
  ;
    c.fillRect(
      Math.cos(t + j) * Math.sin(G) * r,
      Math.cos(G) * r,
      r / 50 - 1,
      r / 50 - 1
    )
  )
    r = 255 / (2 - Math.sin(t + j) * Math.sin(G = 1.2502 * j))
}
Scene 7 — Rotozoomer
The final scene is a retro classic, the rotozoomer. The effect works by plotting rectangles from the top-left of the canvas to bottom-right. The colour of each rectangle is determined by stepping over a texture (a space invader in this case) at an angle, creating rotation (the “roto” part), and speed, creating scale (the “zoomer” part).
t => {
  for (
    j = 1e4
  ;
    j--
  ;
    "p}¶¼<¼¶}p".charCodeAt(
      50 + Y * -Math.cos(t) + Math.sin(t) / 8 * r & 15
    ) >> (r * Math.cos(t) + Math.sin(t) / 8 * Y + 50 * t) % 15 & 1 && c.fillRect(
      5 * r,
      5 * Y,
      5,
      5,
      H(
        r,
        50
      )
    )
  )
    r = j % 128 - 64,
    Y = j / 128 - 40 | 0
}
The result
I'm very happy with the way Flux turned out. I believe it’s my best entry to date and, despite my conservative estimations, I managed squeeze to all seven scenes, music and the player into 1024 bytes. Flux placed 5th in this years competition.
Here’s the final, compressed entry:
for(_=';j--__;zt>>~+t%Lr=K$(Jj=PatOe3Nheight j/
r/
t)
MOh.cos(*G+=
,MOh.sin(t+j)*GharCodet=>{100%
+
/8*0,255AA*j
*j128
c[c.
for( 50)))*r,c.rotOe(
,
-1,
-1K/(
fc](JP2N)z)}, $ in c)c[$[0]+$[6]]=$; a.style="width:; :;object-fit:contain",g=t=13120$=(l,
=>
fy]=`hsl(${l},,${t}%`,f=1N,a. |=requestAnimOionFrame(f,
ta](32174),[
gC]="exclusion",P64zc.fill(c.arc(
9,7,
ba](JG=
&,()-)j3-()+P4Nz512&j||Jj%8*,99-1e4/r,(3-
-j%8(3-(
8&7)L1
=2,r)K3N/(
L1*8jj
=,rK
(+L8Z=A=;G=Z--/9;) Y=P_>-A;
G*19,
G*3,20/G,Y+=7*
2^2*G+9*
,KY<A?Y:A,Jr<Y?190:r+9-
3-G*GG2-=1.22)P1e4z"p}¶¼<¼¶}p".cAt(+Y*-r&15)>>(r*Y+*
%15&1&&5*r,5*Y,5,5,Jr,)Kj%
-64,Y=
-40|0}][t/0%7|0](t/1N)};t--;g=String.fromC((~5|~6|
+(22*t|~4|t<<2)+(t>7e4&&t%
|31)&)+g);with(new Audio("dOa:audio/wav;base64,UklGRqSIFQBXQVZFZm10IBABEAQB8ESsABgAZGF0YYCI"+btoa(g)loop=play(f(';G=/[-- N-PJ-L~z_]/.exec(_);)with(_.split(G))_=join(shift());eval(_)Some statistics
- The original source is around 5kb in size.
- Minified, the source comes down to 1463 bytes and breaks down like this:
- 214b — Music generator and player
- 210b — Demo player
- 160b — Interference circles
- 197b — Point cube
- 135b — Cubefield
- 86b — Starfield
- 140b — Terrain
- 136b — Globe
- 185b — Rotozoomer
- RegPack'd, the source hits the magic 1024 byte limit.
- The procedural music generator creates a 128k sample.
- The 11 x 8 pixel Space Invader sprite is the only bundled asset, all other graphics are procedurally generated.
Addendum: New Tooling — Bye-bye, CLI.
In previous years, I’ve used grunt/gulp tasks to automate the build of my entries. While these tools are a massive improvement over building entires manually, for me, the process wasn’t as efficent as it could be. I tend to work across different machines and sometimes from different locations so often end up having to maintain multiple copies of the source and the build tools.
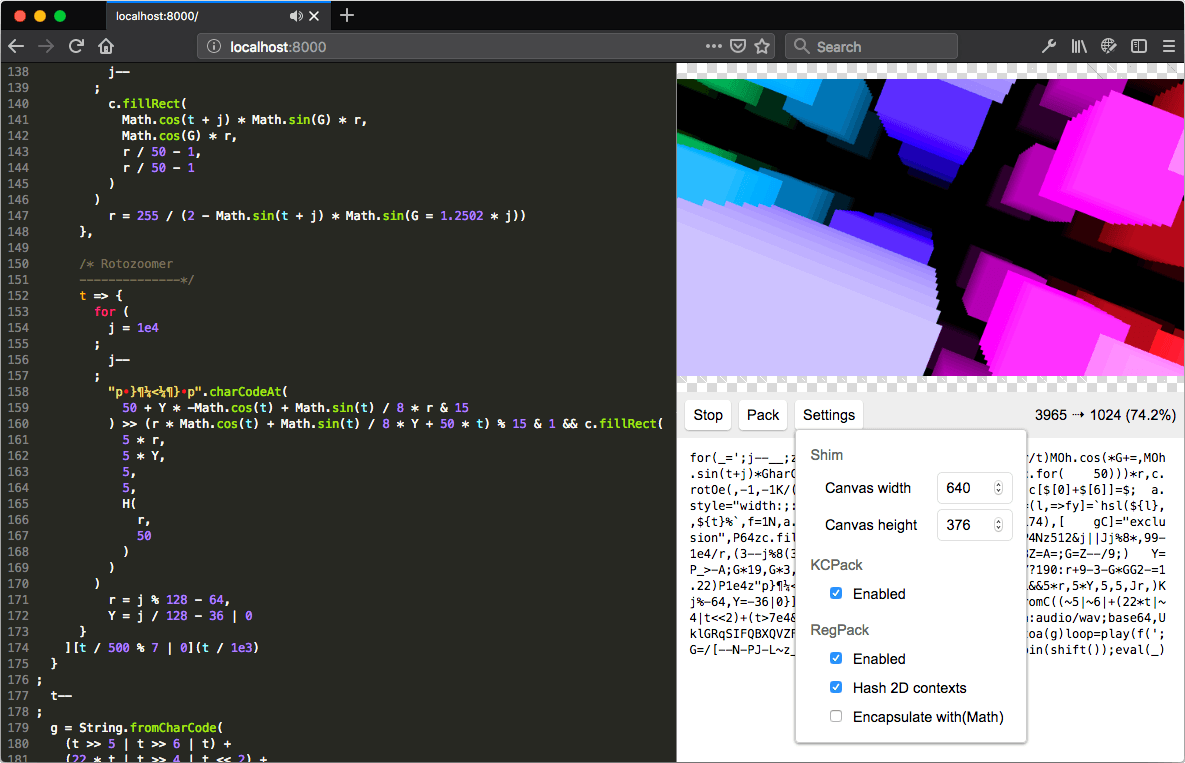
To make the development process faster (and as it turned out, more fun) I decided to quickly put together a simple IDE using CodeMirror, RegPack and my JS own minification toolset. It took a couple of hours to put together, but the time investment was worth it. I could now work on my entry from anywhere using a browser and an internet connection.
The interface is made up of a code editor, a preview window and a few basic settings. The IDE automatically rebuilds the entry and updates the preview window whenever the source code changes, giving instant feedback on how the entry looks and — more importantly — how well it compresses. The build/minification process is very slow so, to ensure the editor remains responsive during the process, the work is offloaded to a web worker. (I had to make a few changes to RegPack to get that working.)